Rolling is a craft. A ritual that can increase mindfulness, and encourage a tighter bond with the plant. Learning how to roll is easy, but mastering the perfect roll everytime… that’s dedication! In this blog we’ll guide you through the rolling process, and hopefully get you on your way to becoming a spliff-master!
What you’ll need:
Rolling Papers (Zig Zag, Raw, OCB, etc)
Dried Cannabis
Grinder
A credit card/hard thin rectangular object.
Scissors
A piece of thin cardboard for the filter
Rolling Tray
Step 1: Setting up the station.
Since rolling practices vary from person to person, feel free to take as much artistic liberties as you want. As long as your desired tools are placed around your rolling surface (or tray), you’ll be good to go!
Step 2: Grinding the Herb.
Take the desired amount of Cannabis and grind it up in your trusty grinder. Refrain from over-grinding the herb so it is easier to manipulate into the joint. Also be sure not to fill your grinder up too much. This can cause it to get sticky and wear out much quicker. Pour your ground herb gently onto your rolling surface.
Step 3: Rolling it up. (The hardest part to master)
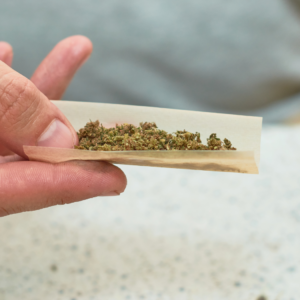
Pull out your rolling paper of choice. This is where rolling gets fun because you’ll find yourself naturally better at rolling with some papers than others. Select a single rolling paper from your pack and lay it flat on your rolling surface. Gently, with a credit card (or something like one) scrape up your ground herb and collect it inside of the paper. Once the herb is in the paper it’s time to get rolling! Pick up your paper delicately and place it between your index fingers and thumbs, with the glued side facing you. Start to gently roll the paper between your index and thumbs so the herb inside begins to fill out the paper. Once the herb has been manipulated into a roughly cylindrical shape, tuck one side of the rolling paper over the herb. Now, you must moisten the glue side of the paper. Gently squeeze your joint, and roll it into shape. Make sure the glued side is firmly attached to the outside of your rolling paper. You now have a filterless joint!
Step 4: Adding the filter.
In order to strengthen the integrity of your joint, and avoid getting small pieces of cannabis in your mouth while you inhale, a filter is necessary! You can pick up filter packs from the dispensary or if you don’t have any filters handy you can take a very thin, paper-like cardboard (think bus ticket, or business card) and cut a rectangle ½ inch tall and about 3 inches long. Roll the cardboard into a small cylinder. You’ll notice that one side of your joint is naturally narrower than the other. This is where you will insert your small filter. If your filter is too thick to fit inside, you can cut it off until it slides in easily.
Step 5: Pack, twist and test.
You’ll notice that the top of your joint is still open. You can pack it in with the pencil or other packer in order to collect some of the excess cannabis that still resides on your rolling surface. After that, gently take the open side of your joint and twist it until it is closed. Then take the joint filter first and inspect if the filter is properly done. There should be a little swirl that will protect your mouth from the loose cannabis inside your joint. Take a test inhale without lighting it to see if it pulls properly. There should be a little bit of retractability in the joint when inhaling dry. This is how you know you’ve rolled a perfectly smokable joint.
Step 6: Find a quiet place to enjoy.
That step pretty much sums itself up!
The more you roll, the better you’ll get. You’ll also find that rolling your own joints will teach you patience and improve your dexterity!
We hope that this helped you understand the basics of rolling your own joint. If you have any other questions or concerns related to cannabis use or application, please feel free to reach out!


